Saturday, March 9, 2013

G&G (known as Dueba/Barbie) A21 Grey Circle Lens Review


For my echo cosplay, I got to try out an all new color for circle lenses. I had never bought grey lenses before, so I had no idea where to start. The problem I ran into, was that a lot of grey lenses seemed to be made to wear for beauty purposes, so they weren't necessarily designed for dramatic effect. I did A LOT of research on this, trying to find good pictures of them on other people online, and after literally a few days of looking, I finally decided to settle for these. While ultimately I wasn't really happy with them as cosplay contacts (I'll go more into that later), I have been wearing them every once in a while on days that I dress up, as a nice enhancement to my normal eyes.


Website Ordering

I purchased these from Pinkie Paradise, which is where I usually order from. Ordering was smooth as usual and they arrived fast because I chose the more expensive shipping option since I needed them for a con. I found it hard to find pictures of people wearing these on their site which made the process take quite a bit of time.

Color/Enlargement

As far as color goes, I was disappointed with  these as cosplay contacts as I said earlier, but not with the contacts as a whole. For cosplay, they do not cover the eye enough to make a dramatic or noticeable effect. Since a lot of circle lenses are meant to be worn for beauty purposes, they are a lot of the times made to blend well with the wearers original eye color so they do not look super fake. So as beauty lenses, these are actually really nice. The grey color blended really well with my own eye color creating a very subtle color change, while the black ring around the outside helped make my eyes POP. For every day use these are a nice way to enhance your eyes, but as far as cosplay goes I would not reccomend them. It would seem I am back on the hunt for new grey lenses, but at least I found a really nice pair for everyday use!

Here are the pictures again of the contacts. Again I'd like to reiterate that I'm not an expert at makeup, but I am learning. I'm also still not having luck getting a sunny day to take pictures, since the weather here is so poopy.

The following pictures are not photoshopped and little to no editing was done so they look as close to real life as possible.


Comfort

I was able to wear these comfortably at a convention all day without any issues. The fact that the color is so far away from the pupils also makes them easy to see in without catching any color when looking in your peripherals. The only time I ever had an issue was when I first got them, because one was inside out when I put it on. It took me a while to actually realize what the problem was since I get these without a prescription. But once I did I felt like an idiot. Really though, these are kinda difficult to tell whether they are inside out or not, so be careful when you put them in, or really any circle lens for that matter.  Besides that one instance these were pretty comfy lenses and I often times forgot I was even wearing them.


 Final Verdict:

Website 5/5
No issues ordering
Color/Enlargement Effect 4.5/5
Great for everyday wear but not really good for cosplay.
Comfort 5/5
Wearable all day!!

Would buy again for everyday use, but not for cosplay.


These are nice, comfortable lenses and I would recommend them if you are wanting a subtle boost to your normal eyes. Hope this helps some of you out, and I will have more reviews for you soon! Naka is this next weekend and after that things will calm down enough for me to get caught up on them. 

Thanks for stopping by!

-QK  


Thursday, February 7, 2013

Super Pinky Bright Red Circle Lens Review

Wig is Persephone from Arda :)


There is never a shortage of red eye'd character I want to cosplay. Obviously with my all time favorite character being Motoko Kusanagi from GitS, red contacts are kind of important to me. Even though Motoko's eyes change throughout different versions, there are still a TON of characters, I plan on cosplaying with those bad ass red eyes. So for a while I have been on the hunt for a good pair that I like. Recently while shopping for some for a cosplay, I decided to give the Super Pinky Bright Red contacts a try. As always I had trouble finding someone with around the same eye color as me to compare to, so it was kind of a gamble.

First pic shows my natural eye color

Website Ordering

To start I ordered the from Honey Color instead of Pinky Paradise this time. Pinky only had them in prescription for some reason and I don't require one. This was the first pair I ever bought outside of Pinky, and as far as customer service goes, I didn't have any issues ordering/receiving them and I would buy from again.

Color/Enlargement

The contacts themselves are big. REALLY BIG. I almost thought I wasn't going to be able to get them on my eyes. The enlarging effect is really good, and perfect for portraying anime characters, or if you just want big eyes that POP. I am totally in love with the color too, however like a lot of people who have lighter colored eyes, I had the issue of my natural eye color showing through when my pupils were constricted. You could really only see that though if you were looking up close. If you have very bright colored eyes, keep in mind that your natural eye color will show though a bit. If you have dark brown/black eyes, these will probably look much more natural on you. These are definitely noticeable on me, someone across the room could easily see them, but for much darker colored eyes yours might blend more.

Here's some pictures of them in some different types of light. I apologize the horrible eye makeup. I was in a hurry and makeup isn't really my strong suit anyway. I also apologize for not getting a direct sunlight pic, but it was rainy outside so I had no sun :(

The following pictures are not photoshopped and little to no editing was done so they look as close to real life as possible.


 My new DSLR turned out to be a solid investment. It takes nice detailed pics for this.

 Comfort 

 When first wearing them I found them to be pretty comfortable considering their size, however after applying my mascara, I started to notice some irritation. I couldn't figure out where it was coming from, because my eyelashes were not touching them in anyway, and I didn't get any makeup on them. After a little while the irritation subsided and I was able to wear them comfortably just fine. I know a lot of websites say to put in contacts AFTER you do your makeup, but I used to do that and I ended up ruining my makeup 100% of the time that way. Since I don't wear contacts on a regular basis, I have trouble getting them in and my eyes water a bit after I do. I asked my friend who have worn contacts all their life how they do it, and they said they always put them in first. I've never had any problems until today, and I still don't really know what it was all about.


 Final Verdict:

Website 5/5
No issues ordering

Color/Enlargement Effect 5/5
They are big and the color is so pretty ^3^

Comfort 4.5/5
I'm still not sure if the discomfort was operator error, or the fact that they are so large.

Would buy again!

I'm definitely going to be using these for a while, and they are perfect for cosplay. I might just wear them around everyday I love them so much XD

Well I hope this review was helpful. If you have any question feel free to contact me!

-QK

Sunday, February 3, 2013

Time for an Update!!

I suppose I am due for an update huh?!

After the holidays my year started off busy pretty much immediately. I'm already struggling to keep up with crap but here's what's going on in my little cosplay world.

I am unfortunately not attending Katsucon. I just couln't get enough people together to go. Next year I'm seriously going to try though!

I am attending Naka-Kon as usual.

For that I am working on this as my major project..


AWWWWWW YEEEAAAAHHH

Out of all the things she has done, I just couldn't resist this outfit. Mostly because of DAT GUITAR. I'm so excited to wear this.

This is what I have so far..


Everything made/altered by me. I will better explain how I made everything when the costume is all finished.


I'm also doing another costume for Naka, but due to some issues I've ran into I don't want to announce it just yet becasue I'm not 100% sure it will happen.

Just cross your fingers for me.

I'm also making another costume for Michael, and doing some work for other people so I have a lot on my plate >.<

As far as pictures go I am still trying to get caught up on photo shoots as well. The first one I'd like to knock out is Officer Jenny, and that should be done when the weather gets warmer.

Anyways I should be back soon.

As always thanks for stopping by!

-QK

Saturday, December 1, 2012

Echo from Pandora Hearts Cosplay Breakdown

 Echo from Pandora Hearts


Echo was definitely not the type of character I'm used to cosplaying. Her personality is way more passive and quiet then I am used to. Nevertheless I was still for some reason drawn to her. I liked the transition from quiet/passive to ultra bad ass in an instant. After watching Pandora Hearts for the first time I really fell in love with the series. Originally I had felt like making this would be pretty strait forward, however it proved to be much more of a challenge than I had originally anticipated.


The first issue I ran into was the fact that Echo, like many anime characters, suffers from "Anime Proportions." You all probably know what I'm talking about here. In this case Echo has these freakishly long legs, while still being one of the shortest characters. This would be an issue for me considering I'm 5'8" and a full grown adult >.<

But by adjusting the pattern a bit I was able to make it some what proportioned to my body. Granted it meant making a shorter skirt than I'm comfortable wearing. Luckily I had some shorts to wear underneath..

The pattern was hand drafted, and I started off with the blue dress as a base. I wanted to have the white center peice actually connect the dress in the front, but later I decided that might be a wardrobe malfunction waiting to happen, so I "faked it" so to speak.


 That is an example of the dress base. This is a later picture when I added the buttons on it, becasue I didn't get a picture of it initially. 

After making the dress, I decided to move on to the sleeves next since I needed the dress done to fit them properly.

Originally I got super excited about this cosplay simply for the fact that I didn't have to attach the sleeve to anything SINCE I HATE DOING THAT. But really these turned out to me just as big of a pain. Three failed pattern attempts later, I had things going.


 I marked my designs on it first using sewing chalk

On top of the strange design, this sleeve posed another issue for me.


Bias....

I decided the best way to achieve the look in the ref pictures was to use bias. I'm not use to sewing it with such detail, so it took me a while. I suppose the extra time paid off though, because the designs on the sleeve didn't turn out NEAR as bad as I thought it would.

My dog looks so enthusiastic..

After finishing the bottom I added a cuff at the top and Ta-Duh! My weird unattached sleeve was finished!

I made a second sleeve and then moved on to the front white piece.

I drafted the pattern and double the fabric so it would be nice and sturdy. After that I got to try the automatic button hole maker on my new sewing machine.

I got way too excited about this..
GAHHH I love that feature!! The old sewing machine I was using didn't have this and I had to do it by hand. I can't imagine ever doing one now without this! I made 8 button holes in a flash, and it couldn't have been easier.
Double checking to see if it looked right..

And there.. After that things were starting to come together. I marked where I wanted the button to go on the blue dress underneath. But before I could put the buttons on I had to solve a small issue. 

I needed the right color buttons.

In the ref pictures, they are a really nice periwinkle color (that was my favorite color as a child :3) the problem was in my local fabric stores, this color button only came with 2 in packs of 8, and I wasn't about to buy 5 packs of buttons just to get 2 of the colors I needed. I probably would have been able to buy them online somehwere, but I was short in time so I improvised..

So I decided to hand paint all of them!


I used acrylic paint to achieve the exact color I wanted. However the paint I used created some what of a powered matte finish on the buttons, and I knew it would come off with the slightest scratch. To solve this issue, I used a good old clear coat to make it shine and protect the paint.


The result was awesome! They ended up looking like I bought them that way.

After that the buttons were attached to the blue dress as illustrated earlier, and they seemed to line up OK!

The tie was also made during that time, which you can see in the photo. I just used some left over black satin and ribbon bias to make it. It attaches in the front with velcro :)

From here on it was crunch time, and I didn't get as many pictures. For the dress shirt underneath I found a mens dress shirt from the thrift store and added my own sleeves to it. I made hand pressed ruffles for it that would stick out of the blue sleeves. After that I put the finishing touches on it by adding the covered buttons near the armpit area and attaching ribbon to them, which ran through previously made loops on the detachable sleeves to the back where the bows were. 

In case you have no clue what I'm talking about.

While it looks like in the ref pics that the sleeve is held on entirely by that button loop system, I was worried it may not hold or sit properly so I sewed the sleeve to the top of the armpits on the blues dress just in case. As a result it was much more secured, and I was still able to move just fine in it.

 Test run!

After that things were pretty much done besides the stockings. I threw those together real fast and basically made them boot covers to go over my shoes. for this costume I styled my first wig as well. I used a Jaguar in Silver from Arda wigs, which can be used for another costume as well. My contacts were grey, and purchased from Pinky. I want to start getting in the habit of reviewing lenses as I buy them so look for that soon.


Photo by Daniel Ramirez. Do not use or alter without consent.

After all that here is the final result! 


I'm excited to report I won my first craftsmanship award with this costume at
Nebraskon 2012!


Guess all that work paid off :) This actually ended up being a pretty fun costume to make! I was very happy to see it come together and even more excited to win an award for it. I'm planning on wearing this again soon and hope to maybe get some pictures with other Pandora Hearts Cosplayers. I haven't seen many around my local conventions, however I did see another Echo cosplayer at Nebraskon which was neat :D

Anyways sorry for the somewhat abrupt end to this write up. The holidays are already keeping me really busy so finding time to update stuff is beginning to get difficult. But I'm looking forward to next year with new con's and new costumes :) 

See you soon!

-QK

Thursday, November 22, 2012

Making Megurine Luka's Project Diva Kimono Outfit (Long Title is Long)

Due to the stress of making two costumes in such a time crunch, I didn't get as many pictures as I'd like to for a write up. Still, I think I have enough to get my point across. Again, this isn't meant to be a "how to" or a tutorial, but if these help someone make something, or inspires ideas AWESOME!

The costume is the Project Diva Kimono outfit, and was all made from a hand drafted pattern. I had some difficulty getting the right colored fabrics for this, but in the end I'm OK with what I found.


This costume was especially fun (sarcasm) considering it incorporated two of the things I hate most in sewing.

- Sewing silky fabrics.
- And sewing sleeves.

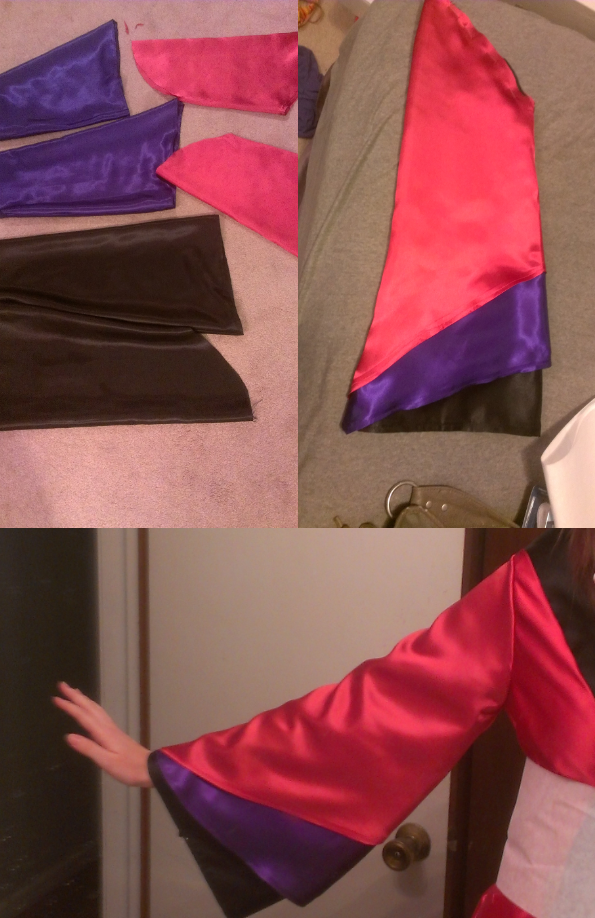
 SIX sleeves to be exact. 

In order to get the layers she has in the ref picture, I made 6 different sleeves, basted them together, then attached them to the main torso piece which you will see here in a second. I really wasn't keen on the idea of making 3 separate tops and wearing them together, so I made 1 and faked the layer you see in the front of the top.
 Top before sleeves were attached

 After that I drafted the pattern for the Obi and bow. I used interfacing for both to make them stiff and sturdy.


I followed used the same idea for Alice's obi on Luka's. It attached at the front and was secured with velcro. I then added button snaps to the bow once it was finish and made it detachable from the main piece for better transportation.


I also got to bust out the fabric paint again for this! I was able to use leftovers from my Alice cosplay which was convenient since jacquard is expensive and my JoAnn's doesn't carry it anymore (those assholes!!)
I really didn't get a good picture of the final product when it comes to the Obi's bow but you can see it in the final picture.

For the main skirt wanted to achieve the crinkle and gradient effect I saw in the ref pics. To do this I actually hand dyed Muslin fabric, twisted it up and let it dry wrinkled.

 I dyed the first section purple, then flipped it and dyed the other part pink.
Someone suggested I used starch to keep the wrinkles from falling out which I ended up not having. They did fall out a bit during wear but I will be going back to address it.


I think one of the things I loved most about making both of these costumes was the accessories hehe ^.^ I used some extra fabric from the hand dyed piece to make my rose clip along with some satin fabric and a silk rose. Both the giant bow and rose had metal hair clips secured to the back of them.

As far as the rest goes, the other black skirt looking portion of the dress was just doubled silk fabric. My shoes were some wedge booties that I made cuffs for. My tattoo was made by me as well using Papillo tattoo paper. I used it to make my friend Linda's as well after making the design in Illustrator. If you want a good tutorial on how to use this stuff check out Vensy's tutorial. I used it, and it turned out wonderful! Vensy is so great <3

Here is the finished product after all that!

 Photo by Mike Tinsley. Miku cosplay by Linda!!

There are still a few things I'd like to tweak on Luka. Otherwise I'm happy with the result regardless of what a pain in the ass it was. Hopefully me and Linda can do a photoshoot soon with these. Once again I Apologize for the lack of photos. If there are any details I missed or if you have any questions, leave a comment or get a hold of me on one of my other profiles.

Breakdown for Echo will be on the way soon. Thanks for stopping by!

-QK


Tuesday, November 20, 2012

Nebraskon 2012: I Ain't Got No Panties On!

So I've been neglecting my blog and other pages quite a bit lately. The good news is this horrific year is almost over! I figured I'd do a brief recap of my Nebraskon trip before the year is over.

My last convention of the year was Nebraskon 2012 in Omaha, NE. This convention has become the best one to attend when it comes to hanging out with friends.  Pretty much everyone in all my groups of friends go's to it, making it an awesome time. Last year was a blast and this year definitely did not disappoint.


For this convention I brought 2 new cosplays. I had also intended to bring a swimsuit for the swimsuit competition, but I didn't have time to finish it.

The two cosplays I made were Megurine Luka's Project Diva Kimono outfit, and Echo from Pandora Hearts

Echo was originally suppose to be done with my boyfriend who was suppose to be Vincent. We started his, but couldn't quite get it done, so we will be going together at a future con as the two :)
I cosplayed Luka with my favorite Lady Linda who went as Miku. We have apparently made it tradition to do Vocaloid cosplays together at Nebraskon hehe ^.^

Here was my final product for Luka!
Here's Linda as Miku, Myself as Luka, and Miss Shelene as Sheryl Nome!


 We had a lot of fun together and overall I think our costumes both turned out great together.


We wore these for Friday and got some good feedback. We got to go get sushi in these as well which was fun! We got some pretty strange looks at the restaurant.

Saturday I wore Echo!


Seeing this come together was really awesome.

Linda went that day as Serah Farron's Summoner outfit (It looked amazing!). I decided to enter the cosplay competition with Echo, since I really didn't have anything better to do that evening. It was a pretty long process like most competitions. Linda was with me as well as my good friends Lulu, Tima, and others, so we kept each other entertained while we waited. The competition went well, and there were a lot of great cosplayers and skits. My walk went smoothly, although everyone told me I went WAY to fast. I was about ready to check out near the end because of how tired I was, but it is a good thing I stuck it through because I got this!
 Derpy Excited Face is Derpy
I finally won my first craftsmanship award!

Up until this point I've either been competing in a higher difficulty then I am due to being in groups, or haven't won anything. Now that I finally have this I can officially be a journeyman without any arguments!


My friend Lulu standing next to me in this won both the Masters category and best craftsmanship in the swimsuit comp. She always dominates it's awesome!!


The Pyramid Head next to me is actually my friend Adam, who won runner up in the intermediate category. I love this picture because he pointed out that we all look like we just left and outlet mall or something with our bags, and I can't get over how funny it looks now.


That night we all got out of cosplay and took it easy.

And you can probably all guess who came to visit.


That's Right.
Rainbow slut..
And she brought friends...

There weren't many pictures taken at this point, but there were some videos which may be used as black mail against me in the future..

And of course on Sunday 


We went to Wheatfields..

Hello breakfast burrito. We meet again..

As I said this was my last convention for the year. I'm spending the rest of the year spending time with family for the holidays, making gifts, and working on cosplay for next year. At the moment I'm trying to make plans to go to Katsucon but that may not happen. I'll be going to Naka as always and I'm definitely going to shoot for ACen again. I'll have a half assed write up on how I made my My Luka and Echo costume coming up here soon, as well as share what my future plans are (they are big).

 Hope everyone has had a great year! And I look forward to seeing everyone in 2013! Enjoy your holidays with friends and family and stay safe!

Oh and don't forget to do the Commander Shepard Shuffle at your office Christmas parties.


Later!

-QK